Welcome to Beadographer
Welcome to the Beadographer user guide. This guide explains the features of the current version of the app.
Beadographer lets you design patterns for beading projects. Create designs using seed beads, cylinder beads, or fuse beads. You can manage palettes, bead libraries, collections, and inventory, work from image files, and export PDFs with diagrams and word charts.
Beadographer has a free version and a membership version. The membership version includes these extra features:
- save your work for later
- export PDFs with diagrams and word charts
- manage your bead collections
- manage your inventory
To learn more about Beadographer, read the about page.
Watch the Tutorials
Our video tutorials are a quick and easy way to learn how to use the app. You can find them on the Beadographer Youtube channel.
Join the Beadographer Common Room
The Facebook Group Beadographer Common Room is a place where users can connect, share designs and tips, and ask for advice.
Errors and Feature Requests
If you found an error in the app, or if you have a feature that you would like to see in a future version, you can contact us through the contact form.
Drawing And Editing
Choose a swatch, then use these tools to add or remove beads on the canvas.
While using Draw, Paint, Line, or Rectangle, hold Alt to use the eyedropper. In Draw mode, hold Shift to erase.
Draw
 |
The draw tool D is selected when a new project opens. Click on the canvas and beads will appear. Change bead style by clicking on a different swatch on the palette. |
Paint
 |
The paint tool P adds or changes entire regions of beads. |
Line
 |
The line tool L adds a line of beads. Click and drag on the canvas, then release to apply the line. |
Rectangle
 |
The rectangle tool R creates rectangles of beads. |
Erase
 |
The erase tool E will remove beads from the canvas. |
Selection And Navigation
Use these tools to move around the canvas, select beads, and pick a style from beads that are already in the design.
Move
 |
The move tool H pans the canvas. Drag on the canvas to change the camera view without changing beads. |
Selection Tools
The three selection tools are Marquee, Select, and Color Select. When you select beads with these tools, you can drag them around the canvas, change their style, or erase them.
Select mode
The Actions panel includes a Select Mode control, which decides how the selection tool behaves.
- Replace mode makes the new selection replace the old one.
- Add mode keeps the current selection and adds more beads to it. It also changes dragging selected beads so the beads are cloned instead of moved.
- Subtract mode removes beads from the current selection.
Hold Shift to switch to Add mode while you work. Hold Alt to switch to Subtract mode. In Add mode, dragging a selected area clones the beads instead of moving them.
Marquee
 |
The marquee tool M selects an area of beads. Drag around the beads you want to include, then release. |
Select
 |
The Select Bead tool S selects beads one at a time or by dragging across them. |
Color Select
 |
The color select tool C selects every bead that uses the same style as the bead you click. This is useful when you want to recolor one style throughout the project, or remove all the beads of a style so you can erase the style from the palette. |
Changing the color of selected beads
When a selection tool is active, clicking a swatch on the palette applies that style to the current selection.
Eyedropper
 |
The eyedropper tool I sets the active style to the same as the clicked bead. It is useful for picking the correct style when multiple styles look similar. |
Image Mode
Use Image mode to place a reference image on the canvas, adjust it, and convert it into beads when you are ready.
Image
 |
The image tool G places an image over the canvas so you can move, resize, and rotate it while you work. |
When Image mode is active, the panel changes to Image options.
If no image is loaded yet, click Load image in the panel. If you want to replace the current image, use New Image in the Actions panel.
Click and drag the image to move it. Drag its handles to resize or rotate it.
Image Options
Image options stay open while Image mode is active. Use the controls there to change scale, rotation, opacity, brightness, contrast, and saturation.
Remove Image
Use Remove Image in the Actions panel when you no longer need the reference image.
Convert Image
Use Convert Image in the Actions panel to turn the current image into beads.
Choose a maximum number of colors, then choose where those colors should come from.
- Create new styles
- Use the current project palette
- Use a saved collection, if that option is available
The app applies styles to beads whose centers fall inside the current image. If you create new styles during conversion, those styles are added to the palette.
The image stays on the canvas after conversion, so you can adjust it and convert again if needed.
Layout And Thread Path
Use these tools in the Layout Editor group when your project is built from components or when you want to control the beading order more closely.
Layout
 |
The Layout tool lets you build a project from layout components such as beads, grids, circles, arcs, and saved custom components. |
Choose Layout from the Layout Editor tool group. When it is active, the panel changes to Layout builder.
Standard Array And Component Layout Projects
Not every project starts in the same format.
- Standard array projects start as one grid or stitch layout. This includes the standard seed-bead layouts such as loom, brick, herringbone, and right-angle weave, and also peyote.
- Component layout projects are built from separate pieces. Custom layouts use this format from the start, and some shaped layouts also use components behind the scenes.
In a standard array project, you draw into one layout. In a component layout project, you add, move, edit, group, and arrange separate components on the canvas.
Adding And Selecting Components
In a component layout project, choose a component type in the panel, then click the + button to add it. The available choices include Bead, Arc, Circle, Disc, Grid, Peyote Triangle, Warped Square, and Cell Grid. If saved components are available in your account, the same list also includes Saved so you can load a custom component instead of building one from scratch.
New components are added to the canvas and listed in the component list. Click a component on the canvas or click its chip in the list to select it.
Drag a selected component on the canvas to move it. Use Select multiple when you want to work with several components at once. You can also hold Shift while clicking component chips.
When more than one component is selected, the floating inspector switches to multi-selection tools. From there you can group the selection, delete it, duplicate it, explode it when supported, or arrange it with alignment and distribution controls.
Component Inspector
When one component is selected, a floating Component inspector appears. It starts with a few fields that are common across component types.
| Field | What It Does |
|---|---|
| Title | Renames the selected component in the component list and inspector. |
| X | Moves the component left or right on the canvas. |
| Y | Moves the component up or down on the canvas. |
| Rotation | Rotates the whole component around its own origin. |
The inspector buttons below the fields are also shared across many component types.
| Action | What It Does |
|---|---|
| Delete | Removes the selected component. |
| Duplicate | Creates a copy of the selected component. |
| Save Component | Saves the selected component for reuse later. |
| Convert To Cell Grid | Turns supported components into a cell grid so you can create a complex repeating pattern. |
| Explode Component | Breaks the selected component into separate beads or smaller parts. |
| Ungroup | Appears for groups and splits the group back into its child components. |
Arrange, Group, And Explode
Use multiple selection when you want to organize several components together.
- Group combines the selected top-level components into one group so you can move and rotate them together.
- Explode breaks a supported component or selection into smaller pieces so you can edit them individually.
- Layer order moves one component forward or backward in the stack.
- Horizontal align and Vertical align line components up to a shared edge or center.
- Distribution spaces selected components evenly.
Array Field Workflow
Many component types use compact list or matrix fields instead of one box per bead. These fields let you edit repeating values quickly.
When you open one of these editors, type the values in the same order the beads or rows are read.
- Use commas to separate values within one row or one sequence.
- Use semicolons to separate rows.
- In row-based fields such as Columns by row, Vertical gap, or Row alignment, semicolons separate one row value from the next.
- In matrix fields such as Active, Bead rotation, or Horizontal bead offset, each semicolon starts a new row and commas separate the values inside that row.
For example, 6; 6; 8 means three rows with 6, 6, and 8 columns. 0, 0, 1; 0, 1, 1 means two rows, with three values in each row.
If a field opens as a popup editor, update the text there and confirm the change. If the app rejects the input, it keeps the previous valid value.
Field Reference
Different component types show different fields, but the meanings stay consistent.
| Field | What It Does |
|---|---|
| Active | Turns individual beads on or off inside a component. Use y for active and n for inactive where the field is text-based. |
| Beads | Sets how many beads are used in a one-row component such as an arc or circle. |
| Rows | Sets how many rows or rings the component builds, depending on the component type. |
| Columns by row | Sets the bead count for each row in a grid or cell grid. |
| Bead diameter | Sets the bead width used for layout spacing. |
| Bead thickness | Sets the bead height or depth used for spacing. |
| Bead default shape | Chooses the bead shape used by that component or bead set. |
| Radius | Sets the size of a circle. |
| Curve | Bends an arc or grid row. Higher values create a stronger bend. |
| Horizontal gap | Adds or removes side-to-side space between neighboring beads or cells. |
| Vertical gap | Adds or removes space between rows. |
| Horizontal bead offset | Moves beads left or right without changing the row structure. |
| Vertical bead offset | Moves beads up or down without changing the row structure. |
| Tangent offset | Slides beads along the direction of an arc, circle, or disc ring. |
| Normal offset | Pushes beads inward or outward from an arc or disc curve. |
| Radial offset | Pushes circle beads closer to or farther from the center. |
| Row alignment | Aligns each row left, center, or right when rows have different lengths. |
Some component types add a few specialized fields.
| Component | Specialized Fields |
|---|---|
| Disc | Carve-out removes rings from the center. Bead Count Increment controls how many extra beads are added as each ring grows. Gap between rings sets the distance from one ring to the next. |
| Warped Square | Compress changes how tightly the warped-square layout packs its rows. |
| Cell Grid | Editable cell beads lets you choose a source bead, add or remove source beads, and edit each source bead's X, Y, rotation, diameter, thickness, and default shape. Horizontal cell offset and Vertical cell offset move repeated cell positions without changing the source bead itself. |
| Arc, Circle, Disc | Tangent, normal, and radial offsets are best used for fine adjustments after the main size and spacing look right. |
Convert To Custom Layout
If the project uses standard array or a peyote star layout, the panel shows conversion controls instead of the full layout builder.
Use Convert To Custom Layout when you want to replace the single array workflow with editable components.
Convert To Custom Layout changes which tools are available. In a standard array project, grid-specific features such as mirror, standard word charts or project diagrams, and copy and paste are no longer available. In a peyote star project, star views, star beading tools, and peyote-star PDF export are also removed.
After conversion, the project becomes a component layout. The app creates a starting component arrangement from the current project so you can keep editing from there.
Thread Path
 |
The Thread Path tool records the order you want to bead, row by row and block by block. |
Choose Thread Path from the same Layout Editor tool group. When it is active, the panel changes to Thread Path.
Custom thread paths are optional. If you do not create one, the app keeps using its default beading order for layouts that support it. As soon as your project has a custom thread path, that custom path becomes the order used for the word chart and for Beading mode.
In component layout projects, the app can also build a default path from the current components. You only need to draw a custom thread path when the automatic order is not the one you want.
Building A Thread Path
Use New block to start a separate named section of the path. Use New row to add another row inside the current block.
Click a row in the panel to make it current, then click or drag across beads on the canvas to add them in order. The row stays selected while you draw.
Each block can be renamed or deleted from the panel. Each row shows how many beads it contains.
Use Edit row to clear the current row so you can draw it again. Use Delete row when you want to remove the row instead of redrawing it.
Blocks, Rows, And Overrides
Think of blocks as named sections and rows as the actual beading sequence inside each section.
- Blocks help you break a large project into practical stages.
- Rows determine the order shown in the thread-path word chart.
- The order of beads inside a row determines the step order used while beading.
If a custom thread path exists, it overrides the default path for that project. If no custom path exists, the app falls back to the default path instead.
Effect On Word Charts And Beading Mode
The thread path is not only a drawing aid. It changes the instructions the app generates.
- The word chart follows the effective thread path.
- Beading mode uses the same order to decide which beads and steps are current or already built.
- Changing the thread path changes the sequence the next time you open or continue beading.
Other Modes
Mirror
 |
The Mirror tool places mirror guides on the canvas so Draw and Erase can affect matching beads on the other side. |
In standard grid projects, click on the canvas to place the mirror origin. Use the Mirror options panel to turn the vertical and horizontal guides on or off.
In custom layout projects, the Mirror options panel switches to mirror presets. Choose the mirror pattern you want, then adjust the origin, tolerance, or rotational symmetry if needed.
Row Shift
 |
The row shift tool W toggles the stagger pattern for the row or column you click. |
Use Row Shift when you need to change which rows or columns are offset in a staggered layout.
This tool is available only in layouts that support row or column shifting, such as Loom, Brick, and Peyote.
Click a bead in the row or column you want to change. The app updates the shift pattern immediately.
Marker
 |
The Marker tool places the active marker on beads, or removes it if that marker is already there. |
Markers add extra information to beads without changing their style. You can use them for notes such as special beading instructions, and the marker list can also appear in PDF export.
When Marker mode is active, the panel changes to show marker options.
If markers already exist, choose the active marker in the panel. If not, open the marker manager and create one first.
Click a bead to place the active marker. Click the same bead again to remove that marker.
Beading
 |
The beading tool B opens a floating instruction window that walks you through the design row by row, step by step, or bead by bead. |
When Beading mode starts, a floating Beading Mode window appears over the app. You can drag it to a different position or minimize it.
Use Previous and Next to move through the instructions. Change Advance By if you want the window to move by row, step, or bead instead.
Use Show Built Rows when you want completed rows to stay visible in the instruction window. Use Reset to start the beading progress over.
Panels: Actions And History
The Actions tab contains tools for saving, selection work, palette tasks, image work, view toggles, and camera controls.
The History tab shows your edit timeline and lets you return to earlier steps or keep named pins.
Common Actions
Save
 |
Save Cmd+S saves the current project. |
Undo And Redo
  |
Undo Cmd+Z reverses the most recent change. Redo Cmd+Shift+Z reapplies the next change. |
For the full timeline view, pinned steps, and jumping to older steps, see History Panel.
If you undo or jump back to an earlier step and then make a new edit, the later redo steps are replaced by the new history branch.
Zoom In And Zoom Out
  |
Zoom In Shift+= and Zoom Out - move the canvas to the next zoom step. |
Use these buttons for step-by-step zoom changes. If you want precise control, use Zoom in the Camera section.
Select Actions
Transform
 |
Transform opens the selection transform controls for the beads that are currently selected. |
This button is available only when beads are selected.
The Transform popover contains rotate, flip, and repeat actions. Click the action you want and the app applies it to the current selection immediately.
Rotate
Rotate Left turns the selection 90 degrees counterclockwise around the center of the current selection.
Rotate Right turns the selection 90 degrees clockwise around the center of the current selection.
Rotate 180 degrees turns the selection upside down around the center of the current selection.
Flip
Flip Vertical mirrors the selection left to right across a vertical line through the center of the current selection.
Flip Horizontal mirrors the selection top to bottom across a horizontal line through the center of the current selection.
Repeat
Repeat Right fills the space to the right with copies of the current selection. Each new copy is placed one selection-width away from the previous one.
Repeat Left does the same thing to the left.
Repeat Up fills the space above the selection with copies, stepping by the selection height.
Repeat Down fills the space below the selection with copies, stepping by the selection height.
In custom layout projects, transform tools work only when the selection stays inside one supported component. Some component shapes also limit the available actions, so you may see only the transforms that fit that layout.
Erase Selection
 |
Erase selected Backspace removes the beads that are currently selected on the canvas. |
Select Mode
 |
Select Mode opens the mode picker for the selection tools so you can switch between replace, add, and subtract behavior. The icon changes to reflect the current selection mode. |
To read about the different select modes, see Selection And Navigation.
Palette Actions
Palette actions use the swatch selection in the Palette panel. For choosing the current swatch or selecting several swatches at once, see Panels: Palette Panel And Swatches.
Open Bead Library
 |
The Bead library button Cmd+L opens the bead library browser. |
Learn more about the Bead Library.
Edit Style
 |
Edits the current style Option+E |
Learn more about editing a style.
New Style
 |
New Style Option+P adds a new style to the palette. |
Learn more about creating a new Style.
Delete Style
 |
This deletes the currently selected styles, if they are not used on the canvas. |
Merge Styles
 |
This combines two or more selected styles together. This action is enabled when at least two bead styles are selected in the palette. |
Create Bead Soup
 |
Creates a bead soup from selected styles. This action is enabled when at least two bead styles are selected in the palette. |
Image Actions
Add Image
|
Add an image to the canvas |
Learn more about working with images.
Remove Image
|
Removes the image from the canvas. |
Convert Image
 |
Converts current image into beads. |
For full instructions, see Image Mode.
View And Camera Actions
Symbols
 |
Show bead symbols Cmd+Shift+1. |
Markers
|
Shows / hides markers. |
This changes the view only. It does not create, remove, or place markers.
Learn more about markers.
Inactive
 |
Shows / hides inactive beadsCmd+Shift+2. |
Finish
 |
Shows / hides the bead finish Cmd+Shift+3. |
Grid lines
 |
This tool Cmd+Shift+4 shows or hides the guide lines. |
Ruler
 |
Shows / hides the ruler Cmd+Shift+5. |
Scale Grid
 |
Shows / hides the scale grid Cmd+Shift+6. |
Borders
|
Shows / hides bead borders. |
Flip
 |
Flips the camera view horizontally. This changes the view only. It does not rewrite the pattern or move beads. |
Star View
 |
Star view appears for peyote star projects and opens a menu of available star views, including Front view, Back view, and warped-square views. |
Zoom and Rotate
The Camera section includes a Zoom and rotation slider and number field for direct zoom and rotation control.
History Panel
Open the History tab when you want to review earlier edits, jump to a different point in the timeline, or pin steps for important milestones.
Pinned steps are kept only for the current editing session. They are not saved when you close the app or reopen the project later.
Go To Step
Click any item in the history timeline to jump to that step. Use this when you want to inspect an earlier version without stepping through every undo one by one.
Pin Step
 |
Pin current step saves the current history step as a named pin. |
Use pins for milestones such as a completed section, a color version you may want to revisit, or a checkpoint you may want to return to.
If you go back to an earlier step and make a new edit, the old future branch still disappears from the main timeline. Your pinned steps remain available in the Pinned steps view, including pins from that earlier branch.
Show Pinned Steps
 |
The Pinned steps view shows every named pin you have created for the current history. |
Palette Panel
The Palette panel shows the styles in your project. The currently selected styles is marked with a black border.
Use Compact view when you want to see many styles at once. Use List view when you want to see style names and product details.
The current style controls what drawing tools place on the canvas. Palette multi-selection is used for palette actions such as Delete Style, Merge Styles, and Create Bead Soup.
Palette Panel Overview
The current swatch stays highlighted in the panel. If you select extra swatches for palette actions, those swatches are highlighted separately so you can still see which style is active for drawing.
Palette actions are covered in Panels: Actions And History. For creating or editing styles, see Palette Menu.
The current swatch is used by the drawing tools as described in Drawing And Editing.
Move Swatch
Drag a swatch to a new position to reorder the palette. You can do this in both Compact view or List view.
Select Multiple
Select several swatches when you want a palette action to work on more than one style.
| Action | How |
|---|---|
| Select a range | Hold Shift and click another swatch |
| Add or remove one swatch | Hold Cmd on Mac or Ctrl on Windows and click |
These clicks change the palette selection without changing the current drawing style.
Use multi-selection before actions such as Delete Style, Merge Styles, or Create Bead Soup. Those actions are described in Palette Actions.
Select Current Style
Select Current Style selects every bead on the canvas that uses the current swatch.
Choose the swatch first, then use Select Current Style from the Select menu. You can also hold Alt and click a swatch in the Palette panel.
The app switches to a selection mode if needed, then selects every matching bead. Use this when you want to move, recolor, or erase all beads of one style at once.
File Menu
Use the File menu to create projects, open saved work, save versions, and download files.
New
New starts a project from scratch.
If Use new project wizard is turned on, the app walks you through these choices:
- Enter a title.
- Choose a library and layout.
- Choose an offset pattern if that layout uses one.
- Choose a palette.
- Set the project size, then click Create.
The summary and preview update as you move through the wizard.
If the wizard is turned off, the same choices appear in one dialog with a live preview.
Open
Open shows your saved projects.
Search, Filter, And Sort
Use the search box to narrow the list as you type. A regular search checks the project title, description, tags, library, and layout.
You can also search by tag with the special tag: prefix. For example, enter tag:bracelet to show only projects with that tag.
If you enter more than one word, the list keeps only projects that match all of them. You can combine regular text and tag searches in the same query.
Use Filter by tag to pick from tags already used in your saved projects. Clicking a tag badge in the list applies the same tag search for you.
Use the Library and Layout filters when you want to narrow the list without typing. Turn on Show deleted to include deleted projects in the results.
Use Sort by to switch between modified date, created date, and title. Use the sort direction button next to it to reverse the order.
Open A Project
Select a project, then click Load Project. The current project is marked in the list.
Share
Select one saved project and click Share... to create a share code. Use Unshare to remove that code.
Delete And Restore
Use Delete to remove selected projects from the main list. Turn on Show deleted to find them again, then click Restore.
Versions
Click Versions... to browse older saves for the selected project. Choose a version and restore it to open that version as a new project.
Save
Save updates the current saved project.
If the project has not been saved before, the app asks for a title first.
Save As
Save As creates a new saved copy of the current project.
Enter the new project title, then save. The new copy becomes the project you continue editing.
Share
Share creates a share code for the current saved project.
Save first if you want the latest changes included. After the code appears, copy it and send it to the other user. They can open it with Load Share.
Details
Details stores project information that helps you organize work and use it in exports.
Project Info
Use this section to edit the title, tags, description, credits, and beading instructions.
Library And Bead Size
Use this section to change the project library. Depending on the project, you can also edit bead diameter, bead thickness, and gap between beads.
Canvas Size
Canvas Size changes the size of the current canvas.
Set Canvas Size
Enter the number of rows and columns, review the estimated canvas dimensions, then click Set canvas size.
Add Rows Or Columns
Choose whether to add rows or columns, enter how many to add, choose whether to add them at the start or end, then click Add Rows/Columns.
Trim
Click Trim to remove empty outer rows and columns.
Import Project
Import Project opens a project file from your device.
Choose a .bead file or a Beadographer project JSON file. The imported project opens in the editor as a local unsaved project.
Load Share
Load Share opens a project from a share code.
Enter the code, then click Load. The app loads the latest saved state as a new local unsaved project.
Download Project File
Download Project File saves the current project as a JSON file.
Use this when you want a portable project file for backup or later import. To open it again, use Import Project.
Screenshot
Screenshot downloads the current canvas view as a PNG.
The file uses the project title when one is available.
Settings
Open Settings from the Edit menu to change app-wide preferences. Choose a tab, change the entries you want, then click Apply.
Some tabs show extra controls when you turn on a related option.
General
Use General for startup defaults, theme, language, and help.
| Setting | Use |
|---|---|
| Language | Changes the app language. |
| Favorite Library | Sets the library offered by default when you start a project. |
| Use New Project Wizard | Enables the step-by-step new project flow. |
| Preferred Unit Of Length | Sets the preferred measurement unit used in the app. |
| Theme | Choose Default, Dark, Pastel, or Custom. |
| Custom Theme Colors | If you choose Custom, you can specify the colors here. |
| Show Help Hints | Shows/hides all help hints in the app. |
Use Reset dismissed hints to re-show hints you closed earlier.
View
Use View for panel layout and on-screen helpers.
Desktop And Mobile Layout
These entries let you choose different positions for desktop and mobile.
| Setting | Use |
|---|---|
| Panel Position | Places the main panels at the side or bottom. |
| Toolbar Position | Places the toolbar at the top or left. |
Display And Helpers
| Setting | Use |
|---|---|
| Show Bead Information | Shows bead details when you hover over a bead. |
| Show Ruler | Shows / hides the ruler. |
| Ruler Position | Chooses whether the ruler appears at the top or left. |
| Show Scale Grid | Shows a measurement grid over the canvas. |
| Scale Grid Color | Changes the grid color. |
| Scale Grid Spacing | Sets the spacing between grid lines. |
| Panel Action Button Location | Places panel action buttons in the header or footer. |
| Show Minimap | Shows the minimap. |
| Minimap Location | Chooses the corner of the canvas where the minimap is displayed. |
Canvas
Canvas settings show bead display and drawing aids.
Bead Display
| Setting | Use |
|---|---|
| Show Bead Symbols | Shows symbol letters on beads. |
| Show Inactive Beads | Shows beads marked as inactive. |
| Show Finish | Shows bead finish details. |
| Show Bead Borders | Adds borders around beads. |
Beading Mode
| Setting | Use |
|---|---|
| Show Built Rows | Keeps completed rows visible while you work in Beading mode. |
| Advance By | Moves through Beading mode by row, step, or bead. |
Guide Lines
| Setting | Use |
|---|---|
| Show Guide Lines | Shows guide lines on the canvas. |
| Horizontal Guide Spacing | Sets the horizontal gap between guide lines. |
| Vertical Guide Spacing | Sets the vertical gap between guide lines. |
| Guide Line Color | Changes the guide line color. |
Inventory
Use Inventory to control stock labels and default inventory units.
| Setting | Use |
|---|---|
| High Stock Threshold | Sets the minimum count for the high stock label. |
| Medium Stock Threshold | Sets the minimum count for the medium stock label. |
| Low Stock Threshold | Sets the minimum count for the low stock label. |
| Very Low Stock Threshold | Sets the minimum count for the very low stock label. |
| Preferred Inventory Unit | Chooses whether inventory is shown in grams, packages, or beads. |
| Default Package | Sets the package name offered by default in inventory actions. |
Export
Use Export to set default values for PDF output.
| Setting | Use |
|---|---|
| Brand Image | Uploads the shared image used by export header and footer brand-image slots. |
| Export Paper Size | Sets the default paper size. |
| Page Orientation | Sets the default page orientation. |
| Default Diagram Zoom | Sets the starting diagram zoom. |
| Black And White Diagram | Makes diagrams use black and white by default. |
| Rotate Diagram | Rotates diagrams by default. |
| Rotate Project Image | Rotates the project image by default. |
| Default Heading Font, Size, And Color | Sets the default heading style. |
| Default Sub-heading Font, Size, And Color | Sets the default sub-heading style. |
| Default Paragraph Font, Size, And Color | Sets the default paragraph style. |
| Date Format Preference | Sets the date format used in exports. |
| Show Empty Beads With * | Marks empty beads with an asterisk in exports. |
| Favorite Template | Sets the template selected by default. |
These are default values, not per-project edits. New projects start with them, and when you apply changed export defaults the app can also update the current project's export settings from those new defaults.
Changes you make later in Export > Export As PDF only affect that project and do not change these global defaults.
Input
Use Input to control touch, wheel, and drag behavior.
| Setting | Use |
|---|---|
| Allow Pinch To Zoom (touch) | Lets you zoom with a pinch gesture. |
| Allow Touch Pan (two-finger) | Lets you pan with a two-finger touch gesture. |
| Allow Wheel Zoom (mouse/trackpad) | Lets the wheel or trackpad zoom the canvas. |
| Allow Wheel Pan (mouse/trackpad) | Lets the wheel or trackpad pan the canvas. |
| Reverse Scroll Direction | Reverses the wheel or trackpad direction used by the app. |
| Disable Reorder Bead Styles By Dragging | Turns off drag reordering in the palette. |
Shortcut Keys
Use Shortcut Keys to change keyboard shortcuts and how shortcut hints appear.
| Setting | Use |
|---|---|
| Shortcut Key Hints | Chooses whether shortcut hints show automatically, always, or never. |
The shortcut list is grouped into App, Edit, Modes, Styles, View, and Export.
Click a shortcut field, press the new keys, then apply the change. Use Reset all to restore the default set. If two actions use the same shortcut, the app shows a conflict warning.
Edit And Select Menus
Use the Edit and Select menus for settings, clipboard work, and selection commands.
Edit Menu Overview
The Edit menu groups together app settings, undo and redo, and clipboard actions.
For settings, see Settings. For undo and redo, see Panels: Actions And History.
Copy
Copy stores the current selection on the clipboard.
If nothing is selected, the app does not create a clipboard item. After copying, use Paste to place the selection again.
Paste
Paste places the copied selection back on the canvas.
When you paste, the app enters paste mode so you can position the preview before you commit it. In layouts with more than one valid paste target, choose the target component first.
Paste Motif
Paste Motif opens your saved motifs.
Choose a motif, then paste it with the same paste workflow used by regular copy and paste.
Select Menu Overview
Use the Select menu to build, clear, and reuse selections.
Select All
Select All selects every non-empty bead in the current project.
Invert Selection
Invert Selection selects the non-empty beads that are not selected and clears the ones that are.
Select None
Select None clears the current selection.
Select Current Style
Select Current Style selects every bead that uses the current swatch.
For choosing the current swatch, see Panels: Palette Panel And Swatches.
Erase Selection
Erase Selection removes the selected beads from the canvas.
Any markers on those beads are removed at the same time.
Create New Motif
Create New Motif saves the current selection as a reusable motif.
Enter a title, then save. You can place it later with Paste Motif.
Palette Menu
Use the Palette menu to edit the current palette, create or change styles, and save palettes for reuse.
Edit Palette
Edit Palette opens the full palette browser for the current project.
Use it when you want to sort styles, reorder them, edit one style, or run actions on several selected styles.
Sort Palette
Sort Palette reorders the current palette by Product ID, Title, Description, Bead count, Hue, Luminosity, or Hue and luminosity. Choose the sort order, review the preview, then click Apply.
Reorder Styles
Reorder Styles lets you move one style at a time. Select a style, then use Move to Top, Move Up, Move Down, or Move to Bottom. Click Done when you have finished.
Match Styles To Library
Match Styles to Library tries to match selected styles to library products. Use it when your project has generic styles that you want to match to real bead products.
Merge Styles
Merge Styles combines two or more selected bead styles. After you click Merge Styles, click the style you want to keep.
Create Bead Soup
Create Bead Soup turns selected bead styles into one mixed style. Enter a title and optional description, then save the soup.
A bead soup can be used like any other swatch, but the app draws from its included styles at random.
Assign Symbols
Assign Symbols gives symbols to the selected bead styles in the palette browser. If some selected styles already have symbols, choose whether to skip them or overwrite them.
New Style
New Style Alt+P opens the style editor and adds a new swatch to the current palette.
Enter the style details, choose its appearance, then save. If you are building from bead products, you can also link the style to a library bead from the editor.
Edit Current Style
Edit Current Style Alt+E opens the currently selected style and lets you edit its appearance and details.
Delete Unused Styles
Delete Unused Styles removes every style in the current project palette that is not used on the canvas.
This deletes all unused styles at once. If you want to remove only some unused styles, use Edit Palette and select those swatches first.
Assign Bead Symbols
Assign Bead Symbols assigns symbols across the project palette. If some bead styles already have symbols, the app asks whether to skip them or overwrite them.
Use this when you want symbol view ready for the whole palette at once.
Save Current Palette
Save Current Palette stores the current project palette as a reusable saved palette.
When you save a palette, enter:
- a palette name
- an optional description
- an optional associated library
If you choose an associated library, that saved palette will also appear when you create a new project for that library.
Saved palettes with no associated library will appear as available for every bead library.
Saved Palettes
Saved Palettes Alt+Shift+P opens the list of palettes you have saved.
Each saved palette shows its name, style count, description, associated library, and a preview of its swatches.
| Action | What it does |
|---|---|
| Load | Adds the selected saved palette to the current project palette |
| New Palette | Creates a new empty saved palette |
| Update Styles | Opens the saved palette in Edit Palette so you can change its styles |
| Edit Details | Changes the saved palette name, description, or associated library |
| Delete | Removes the saved palette |
If a saved palette is associated with a different library, the app shows a warning before loading it.
Library Menu
Use the Library menu to browse bead products, track stock, manage collections, and maintain custom libraries.
In Bead Library, you can drag selected products straight into the palette instead of using Add to Palette.
Bead Library
Bead Library shows the products available for the current project library.
Use the search box to narrow the list by product ID, title, or description.
If collections are available, use the Show dropdown to switch between the current library, all libraries, or one saved collection.
Use Sort to order the list by title. If inventory is available, you can also sort by stock. Turn on Sort by color to group products by their distance from a chosen color.
Select one or more rows to work with them.
| Action | What it does |
|---|---|
| Add to Palette | Adds the selected products to the project palette as swatches |
| Swap in Palette | Replaces the current swatch with the selected product |
| Add to Collection | Adds the selected products to a saved collection |
| Inventory | Opens inventory actions for the selected products |
If you want to match existing project swatches to library products, you can do that in the Palette Editor.
Inventory
Inventory tracks stock, locations, packages, and recent changes for library products.
Search, Filter, And Sort
Use the search box to narrow the list. The app searches product details, library names, and location names.
Use the Collection filter to show one saved collection or location. Use the Library filter to limit the list to one library. Use Sort to order the list by title, library, stock, or recent updates.
Update Inventory
Select one or more rows, then use the Actions panel.
You can:
- add quantity
- subtract quantity
- set quantity
- add a note
- set a location
- set a manual stock status
- set the rows as checked
Quantity updates can use grams, packages, or beads. If you use packages, choose a package definition first.
Packages
Use Packages to manage the package sizes used by inventory actions.
Each package stores:
- a package key
- an optional description
- product weight in grams
The package list also shows which package is currently used as the default.
Subtract Project
Use Subtract project to remove the current project's linked bead usage from inventory.
Export
Use Export to download an inventory list.
Choose CSV or PDF, choose what to export, enter a filename, then export.
You can export:
- all beads with inventory records
- all beads in collections
- selected collections
If you export selected collections, choose the collections in the picker first.
Recent Activity
The recent activity table shows recent inventory transactions for the selected inventory rows.
It shows the date, product, change, note, and final bead count. When an entry can be reversed, the table also shows Undo.
Collections
Collections let you group library products together. A collection can also be used as a location for inventory.
The Collections window shows each collection's name, description, bead count, and preview swatches.
| Action | What it does |
|---|---|
| New Collection | Creates a new saved collection |
| Edit | Changes the selected collection |
| Convert to Palette | Builds a palette from the selected collection |
| Load | Adds the collection to the current project |
| Delete | Removes the collection |
Collections are also used in Bead Library filters, the Add to Collection action, and the inventory location picker.
If you load a collection that contains beads from another library, the app asks whether to skip those beads or add them to the project anyway.
Custom Libraries
Custom Libraries lets you create and edit your own bead libraries.
For each library, enter:
- a library name
- bead shape
- bead diameter
- bead thickness
- beads per gram
When custom libraries are available, you can add your own bead products to the custom libraries.
Understanding Collections, Palettes, And Bead Edits
Collection / Palette
A collection is a saved group of library products. Use it to organize products, filter the bead library, or track inventory.
A palette is the set of swatches inside one project or saved palette. Use it when you want styles that you can draw with on the canvas.
You can convert a collection into a palette, but you cannot make a palette into a collection because it may contain generic styles which are not linked to a product.
Library Bead / Palette Bead
Editing a library bead changes the bead definition in the library.
Editing a bead in your palette changes only the swatch in that project or saved palette.
When you edit a library bead, that change carries forward to future projects and future palette imports that use that bead.
When you edit a swatch in the palette, the change stays in that palette only.
Standard Collection / Location Collection
A standard collection is a saved group of products.
A location collection is used as an inventory location. In inventory, you can assign beads to that location and filter by it later. A bead can only belong to one location collection at a time.
Both kinds of collections can group products, but a location collection also works as a place where inventory is stored.
Pattern Menu
Use the Pattern menu to manage reusable pattern assets such as saved components, custom bead shapes, markers, and motifs.
Saved Components
Saved components are reusable layout pieces stored separately from projects.
To create one, open the layout editor, select a component, click Save Component, then enter a title and optional description.
Pattern > Saved Components shows each saved component with its title, bead count, and description.
| Action | What it does |
|---|---|
| Edit | Changes the saved component title or description |
| Delete | Removes the saved component |
To add a saved component back into a layout, open the layout editor, choose Custom when adding a component, then select the saved component. The app adds it at the center of the current camera view.
Custom Bead Shapes
Custom Bead Shapes lets you save bead outlines for reuse.
The library includes built-in shapes and your own shapes. Built-in shapes can be copied and then edited.
| Action | What it does |
|---|---|
| New | Starts a new custom shape |
| Duplicate | Copies the selected shape |
| Edit / Copy to Edit | Edits your own shape, or copies a built-in shape so you can change it |
| Delete | Removes the selected custom shape |
Shape Geometry
Choose a point count from 3 to 6. The editor labels the points as P1, P2, and so on.
Enter X and Y for each point. The editor uses an X/Y coordinate system, and Y is measured from the bottom.
Each Edge curve value controls the edge shown in the same row. Use 0 for a straight edge.
Use Rounded corners when you want softened corners instead of sharp ones. If any edge curve is active, rounded corners are not available.
Shape Key
Each shape also has a Shape key, which is the short name the app uses to identify it.
Use a key that starts with a lowercase letter and contains only lowercase letters and digits.
Markers
Markers stores the marker definitions for the current project.
Use it to create, edit, hide, or delete markers. Each row shows the symbol, description, placed count, and whether the marker is visible.
When you create or edit a marker, enter one symbol and an optional description. You can also choose from the starter symbols.
For placing markers on beads, see Marker mode.
Deleting a marker also removes that marker from every bead where it has been placed.
Motifs
Motifs stores copied selections so you can reuse them later.
To create one, select the beads you want and use Create New Motif.
Pattern > Motifs lets you review and delete saved motifs. Each saved motif shows its bead count, marker count, and size.
To place a saved motif, use Paste Motif.
Export Menu
Use the Export menu to create PDFs, download a purchase list, and manage reusable export text and templates.
Export As PDF
Open Export > Export As PDF to build the PDF for the current project.
The export modal changes the current project's export settings. The defaults in Settings only set the starting values. New projects inherit those defaults, and existing projects can be updated from them when you apply new export defaults in Settings. Changes you make here do not change the global settings.
The export screen has three tabs: Template Builder, Header / footer, and Options. Use Save Template to store the current layout for reuse, Load Template to replace the current project's export settings with a saved template, and Export PDF when the layout is ready.
Template Builder
Template Builder controls the order of the PDF content. Add blocks, move them up or down, and remove any block you do not need.
| Block | Options |
|---|---|
| Heading | Use Project Title or Custom. Custom headings let you enter your own text. You can also change the text style. |
| Sub-heading | Enter custom text and change the text style. |
| Paragraph | Use Description, Credits, Beading Instructions, Project Details, or Custom. Custom paragraphs use the rich-text editor, and you can save or load them as Saved Text. You can also change the text style. |
| Project Image | Choose whether to show bead symbols, markers, finish, bead borders, and inactive beads. You can also rotate the project, turn on custom zoom, set the zoom level, and add overlap margin when custom zoom is enabled. The split preview shows whether the image will span multiple pages. |
| Custom Image | Upload an image for the export, then set its alignment and scale. You can replace or remove the image and check the preview. Custom images are not saved between sessions and need to be re-uploaded if you close the app and reopen. |
| Bead List | Add the bead list and choose whether to include unused beads. You can also change the text style. |
| Markers | Add the marker list and change the text style. |
| Word Chart | Add the word chart, change the text style, and use Alternate direction each row when that option is available for the pattern. You can also convert the word chart into a paragraph block if you want editable text instead. |
| Project Diagram | Set zoom, choose Black and white only, and rotate the project. The split preview shows how many pages the diagram will use. |
| Page Break | Starts the next block on a new page. This block has no other settings. |
Header / Footer
Use Header / footer to fill the six header and footer slots: left, center, and right for both header and footer.
Each slot has the same content choices:
| Slot Type | Options |
|---|---|
| Blank | Leaves the slot empty. |
| Page number | Shows the page number. |
| Print date | Shows the export date using your date format preference from Settings. |
| Paragraph text block | Use Description, Credits, Beading Instructions, or Custom. Custom text uses the rich-text editor, and you can save or load it as Saved Text. You can also change the paragraph style. |
| Brand image | Uses the shared brand image from Settings. Set a separate image width for page 1 and for other pages. |
For every slot, you can also choose Show on first page and Show on other pages.
Options
Use Options for page-wide export settings:
| Option | What it does |
|---|---|
| Export paper size | Sets the paper size for this project's PDF export. |
| Page orientation | Sets portrait or landscape. |
| Show empty beads with * | Marks empty beads with an asterisk in the export. |
These values come from Settings when a project is created, but changing them here only changes the current project.
Purchase List
Export > Purchase List downloads a CSV file for the current project.
The file includes Title, Description, Required Beads, Qty. in stock, and Beads To Buy. Use it when you want a shopping list based on the current project and your inventory counts.
Saved Text
Export > Saved Text stores reusable rich-text snippets for export paragraph blocks.
Use it to keep text you use often, such as care notes, copyright text, or standard instructions.
| Action | What it does |
|---|---|
| New | Creates a new saved text snippet. |
| Edit | Changes the content of the selected snippet. |
| Rename | Changes the snippet title. |
| Delete | Removes the selected snippet. |
You can also save and load these snippets directly from custom paragraph blocks in Export As PDF.
Templates
Export > Templates shows your saved PDF layouts.
Templates store the current export blocks, header and footer content, and export options. Loading one replaces the current project's export settings.
| Action | What it does |
|---|---|
| Load | Applies the selected template to the current project. |
| Rename | Changes the template title. |
| Delete | Removes the selected template. |
You can create templates from Export As PDF with Save Template.
If you set a Favorite Template in Settings, new projects start with that template. If you keep the setting on Default, new projects use the standard export layout instead.
Reference Appendices
Bead Libraries
The app includes these built-in libraries. You can also create your own custom libraries.
| Name | Bead diameter (mm) | Bead thickness (mm) | Bead shape |
|---|---|---|---|
| Miyuki Round 8/0 | 3 | 2.35 | Round |
| Miyuki Round 11/0 | 2.12 | 1.45 | Round |
| Miyuki Round 15/0 | 1.5 | 1.175 | Round |
| Miyuki Delica 8/0 | 3 | 2.7 | Cylinder |
| Miyuki Delica 10/0 | 2.2 | 1.7 | Cylinder |
| Miyuki Delica 11/0 | 1.6 | 1.3 | Cylinder |
| Miyuki Delica 15/0 | 1.3 | 1.15 | Cylinder |
| TOHO Round 6/0 | 4 | 3.13 | Round |
| TOHO Round 8/0 | 3 | 2.35 | Round |
| TOHO Round 11/0 | 2.14 | 1.59 | Round |
| TOHO Round 15/0 | 1.5 | 1.175 | Round |
| TOHO Aiko 11/0 | 1.8 | 1.38 | Cylinder |
| TOHO Treasure 11/0 | 1.8 | 1.38 | Cylinder |
| Preciosa 6/0 | 4.1 | 3 | Round |
| Preciosa 8/0 | 2.9 | 2 | Round |
| Preciosa 10/0 | 2.3 | 1.6 | Round |
| Fuse Beads | 5 | 5 | Fuse |
Patterns
| Pattern name | Available with | Project structure | Description |
|---|---|---|---|
| Loom | All libraries | Array-based | Choose this for square stitch and bead loom projects. |
| Brick | All libraries | Array-based | Staggered rows for brick stitch designs. |
| Peyote | All libraries | Array-based | Staggered columns for peyote stitch designs. |
| Herringbone | All libraries | Array-based | A beadweaving technique with stacked bead pairs. |
| Right angle weave | All libraries | Component-based | Woven square units arranged in a linked grid. |
| Fringe earring | All libraries | Component-based | A brick stitch earring with hanging fringe. |
| Huichol grid | All libraries | Component-based | A Huichol-inspired grid. |
| Peyote Triangle | All libraries | Component-based | A peyote triangle built from three panels. |
| Warped Square | All libraries | Component-based | A 3D peyote form built from four panels. |
| Peyote star | All libraries | Component-based | A star-shaped peyote form built from five warped squares. |
| Square | Fuse Beads only | Array-based | A square pegboard layout for fuse beads. |
| Hexagonal | Fuse Beads only | Array-based | A hexagonal pegboard layout for fuse beads. |
| Heart | Fuse Beads only | Component-based | A fixed-size fuse bead heart. |
| Disc | All libraries | Component-based | Concentric rings for medallion and other circular projects. |
| Custom | All libraries | Component-based | A flexible layout where you add your own components. |
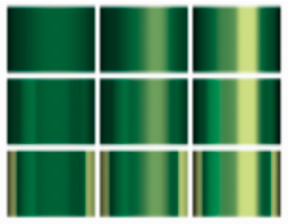
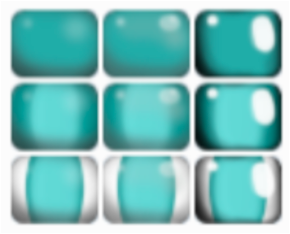
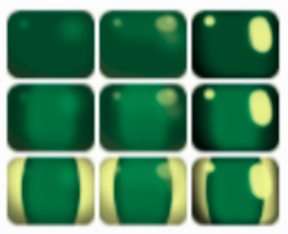
Finish Options
For each diagram, the first line is opaque, the second line is transparent, and the third line is transparent with inner color.
Round beads, no tint
Matte | Semi-gloss | Gloss
Round beads, yellow tint
Matte | Semi-gloss | Gloss
Cylinder beads, no tint
Matte | Semi-gloss | Gloss
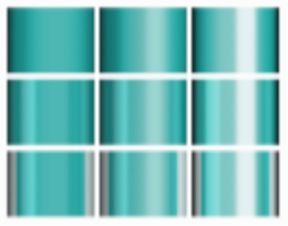
Cylinder beads, yellow tint
Matte | Semi-gloss | Gloss